# How to limit the running of your Raspberry Pi Application to only from a specific SD card
Koshinto is an out-of-the-box application anti-piracy service to provide everything you need for copy protection. You can easily limit the running of your Raspberry Pi Application to only from a specific SD card and block the running of an application copied to another SD card illegally.
All you need is to download a client library named sansi from koshinto and embed it into your application. Necessary credentials are obfuscated and embedded inside the sansi library, so no need for keys, certificates, license definition files, etc which are confusing, prone to accidents, and can be the target of attacks.
Followings are the steps of How to limit the execution of your Raspberry Pi application to only from a specific SD card, with Koshinto.
# Step 1. Signup to the Koshinto
Refer to Sign up / in
# Step 2. Link sansi to Application
Here, we will explain the embedding of sansi using a sample application as an example.
# 2.1 download sample project
On your Raspberry Pi, you can clone it as following:
git clone https://github.com/UedaTakeyuki/sansi_examples.git
then move to sansi_examples/c.
cd sansi_examples/c
You can see following files with ls command as following:
ls
README.md   compile.sh  main.c      main.simple.c   sansi.h
2
The sample application file main.simple.c looks like as follows:
/*
* 10 second countdown, copy guarded by sansi
*
* @author Dr. Takeyuki UEDA
* @copyright Copyright© Atelier UEDA 2020 - All rights reserved.
*/

#include "sansi.h"  // for sansi libraries

#include <stdio.h>  // for printf
#include <unistd.h> // for seep
void tenseccount();

int main(){

  if (ok_confirmed == confirm(NULL, NULL, NULL)){
    printf("OK\n");
  } else {
    printf("NG\n");
    return -1;
  }

  tenseccount();
  return 0;
}

void tenseccount(){
  int i;
  printf("start 10 second countdown\n");
  for (i=10; i>0; i--){
    printf("%d\n",i);
    sleep(1);
  }
  printf("0!\n");
}
2
3
4
5
6
7
8
9
10
11
12
13
14
15
16
17
18
19
20
21
22
23
24
25
26
27
28
29
30
31
32
33
34
35
The structure of this program is just calling the tenseccount() function then exit. The tenseccount() function provides 10 seconds countdown. It seems to be very useful so it embedded the sansi library to protect against unauthorized copying 😃.
To embed sansi, just do the following two things.
- Line 8: include the header file
sansi.h - Line 16-21: Call the confirm() function at the very start of the program, and exit it if the return value is not ok_confirmed.
# 2.2 download sansi
Go back to Koshinto, download sansi library of arm Linux version by following the steps of download sansi library
Then back to your Raspberry Pi again, add the downloaded sansi library to the folder of the sample application cloned before. The result looks like this.
ls
README.md               main.c
compile.sh              main.simple.c
libsansi_ZbPdGoGyrNkQ_arm_v1.1.o    sansi.h
2
3
4
Make sure that the name format of the downloaded sansi library file must be as follows:
libsansi_[12 digit string]_arm_v[number].[number].o
# 2.3 compile
You can use compile.sh script to compile it as follows:
./compile.sh main.simple.c
source   = main.simple.c
libsansi = libsansi_ZbPdGoGyrNkQ_arm_v1.1.o
compiler = gcc
obj      = a.out
compiling…
2
3
4
5
6
You can see that a.out is created.
ls
a.out       libsansi_ZbPdGoGyrNkQ_arm_v1.1.o  main.simple.c  sansi.h
compile.sh  main.c                            README.md
2
3
You can specifiy object file name with -o option.
./compile.sh -o yourapplication main.simple.c
source   = main.simple.c
libsansi = libsansi_ZbPdGoGyrNkQ_arm_v1.1.o
compiler = gcc
obj      = yourapplication
compiling…
2
3
4
5
6
You can see that yourapplication is created also.
ls
a.out       libsansi_ZbPdGoGyrNkQ_arm_v1.1.o  main.simple.c  sansi.h
compile.sh  main.c                            README.md      yourapplication
2
3
The usage of the compile.sh script is as follows:
./compile.sh -h
Usage: ./compile.sh [-h][-c][-g][-m][-o obj] [source] [libsansi]
  [source]:   compiling source file, default is 'main.sample.c'
  [libsansi]: path for linking 'libsansi….o', default is found it in cwd automatically
  [-h]: show this usage and exit
  [-c]: compile for linux by clang
  [-g]: compile for linux by gcc, this is default
  [-m]: compile for mac by clang
  [-o obj] set compiled object file name, default is a.out
2
3
4
5
6
7
8
9
Thankfully, main.simple.c, which I'm about to compile right now, is the default for source file options, so you can even omit it and compile like this:
./compile.sh
source   = main.simple.c
libsansi = libsansi_ZbPdGoGyrNkQ_arm_v1.1.o
compiler = gcc
obj      = a.out
compiling…
2
3
4
5
6
If clang is prefered instead of gcc, specify the -c option
./compile.sh -c
source   = main.simple.c
libsansi = libsansi_ZbPdGoGyrNkQ_arm_v1.1.o
compiler = clang
obj      = a.out
compiling…
2
3
4
5
6
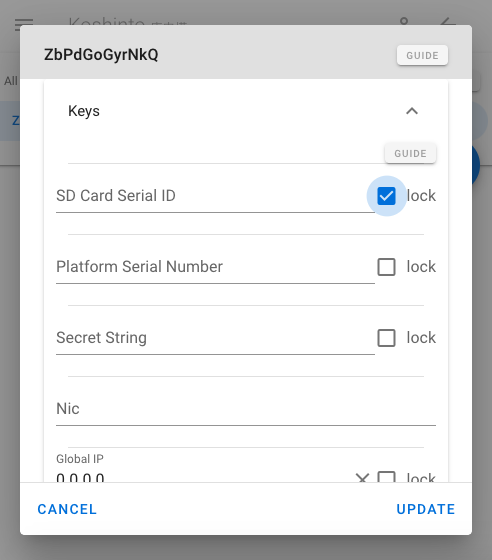
# Step 3. Setting application start permission conditions
Return back to Koshinto and open keys menu, set the lock check box to the right side of SD Card Serial ID as "✓".
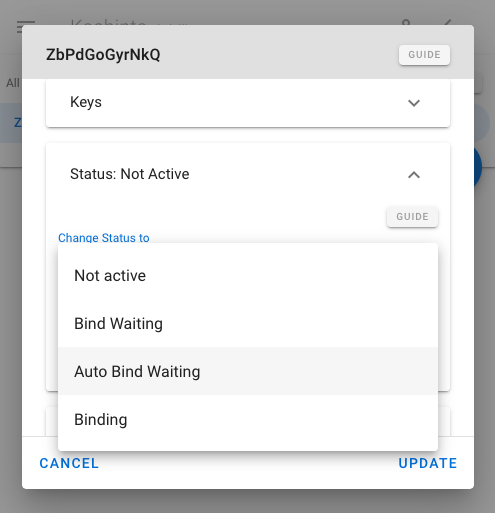
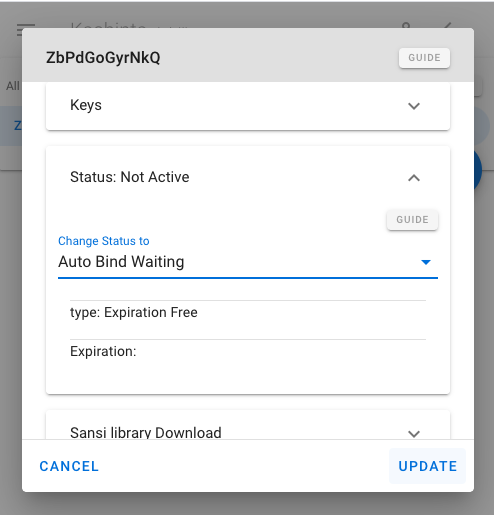
Open the Status of the Bind, it might be Not Active.
select it as Auto Bind Waiting. Then click UPDATE button at the bottom right. The task of settings just that's it!
Go back to the RaspberryPi and run a.out, you'll see the 10 secound countdown run fine.
pi@raspberrypi:~/sansi_examples/c $ ./a.out
OK
start 10 second countdown
10
9
8
7
6
5
4
3
2
1
0!
2
3
4
5
6
7
8
9
10
11
12
13
14
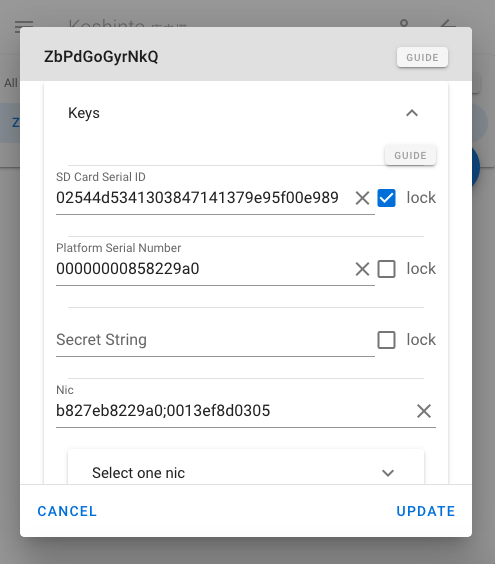
Returning to Koshinto again, refresh Bind data on the Browser with clicking the floating action button of round arrow icon at the bottom right.

Open keys, You can see that they are updated with the values in the user's environment.
If you copy a.out to another SD card and run it, the result is NG without countdown running.
ueda@amfortas:~/sansi_examples/c$ ./a.out
NG
2
Your application has successfully refused to start from anything other than your SD card. Now unauthorized copy problem is no problem because it can't be used.
Notice: In addition to the steps mentioned above, the following setting steps are also available.
- Bind your application directly to an SD card serial id which you already know.
- Wait for confirm() to be executed, check the value sent, and bind your application to it if there is no problem
For detail, refer this document.